
Balancing between Earth and Sky
Guruji writes at the beginning of Light on Life that ‘we human beings live between two realities of earth and sky.’ Earth, he writes, is symbolized by Prakrti (nature) and sky by Purusa (soul). ‘The whole practice of yoga,’ he says, ‘is concerned with exploring the relationship between Prakrti and Purusa, between Nature and Soul. It is about, to return to our original language, learning to live between earth and the sky. That is the human predicament, our joy and our woe, our salvation or our downfall. Nature and Soul are mingled together. Some would say they are married. It is through the correct practice of asana and pranayama and the other petals of yoga that the practitioner (sadhaka) experiences the communication and connection between them. To an average person it might seem that the marriage of Nature and Soul is one of strife and mutual incomprehension. But by communing with them both, they come closer to each other for the purpose of a blessed union. That union removes the veil of ignorance that covers our intelligence.’
Balancing Postures require that we learn to stabilize and exist, one part tethered to earth, one part free to explore sky. Just as there are birds that soar and birds that stay more earth bound, there are balancing postures that explore wide open space and more earthy terrain. The bird image is for my birder friend.
A few notes on balancing. To balance on one foot we must first find stability, especially the foot, the ankle and the outer hips. To teach the foot the proper action of a balancing pose, start by bending over and reaching uder your foot. Move the skin from the center of the arch forward towards the toes and spread the toes, then move the skin from the center arch back towards the heel and spread the heal. Stand up and feel the difference between the two legs having just spread the skin of one foot. Do you feel how the leg is more stable? Now do that for both feet and stand upright. See that the skin of the feet feels evenly spread and to the best of your ability disperse the weight of the trunk evenly over the feet. Learning to spread the feet instead of tightening and shrinking the feet is important for balancing postures. You also have to see when the weight starts to topple to one part of the foot or ankle and stabilize. While it is exciting to go with the freedom of movement, always keep part of your consciousness connected to earth. When you can divide the mind between earth and sky, the balance will come.
Now, there are a few ways to find a grip to the outer hips. First try standing with just one foot on a brick. Stretch up through the leg that you are standing on and roll that thigh in and roll the buttock down. Let the other leg be a bit off to the side and not on the brick or floor. Let it fly free. Also stretch up through that free leg and roll the thigh in. To feel the muscle of the outer hip that needs to grip, take the aerial leg up and out to the side about a foot and you’ll feel a grip at the top of the outer thigh where it meets the outer buttock. That is what needs to learn to grip in. You can also place a brick between your inner top thighs and ‘hold’ the brick, rolling your front thighs towards
the brick while keeping the buttock moving down away from the back waist. Then grip the outer legs in. The ‘gripping’ muscles you feel here will be needed in all of your balancing poses.
Lastly, the abdominals muscles should not be hard but they need to be alert and active. In Tadasana, when you balance the actions of rolling the thighs in and pressing them back while moving the buttock down, you will feel a subtle lift in the region of the abdomen. This is important for the health of the spine, but it is also important to access this area for balancings.
Again, this is not a full sequence. And I apologize as the quality of the photos is not the best, I am working with some pretty basic supplies as I wing this. Advanced students, start with your inversions if you like or add at the end. Consider practicing Sirsasana II in place of v. 1. Beginner and Intermediate students, you can start with a few standing postures before undertaking balancing. If you are practicing inversions, you can insert them after the standing balances if you like. Beginners might also stick with just working on a few forward bends and not try the earthy arm balancings quite yet. Be sure to end with Salamba Sarvangasana (shoulder balance) or Setu Bandha Sarvangasana (bridge) and then Savasana (resting corpse)
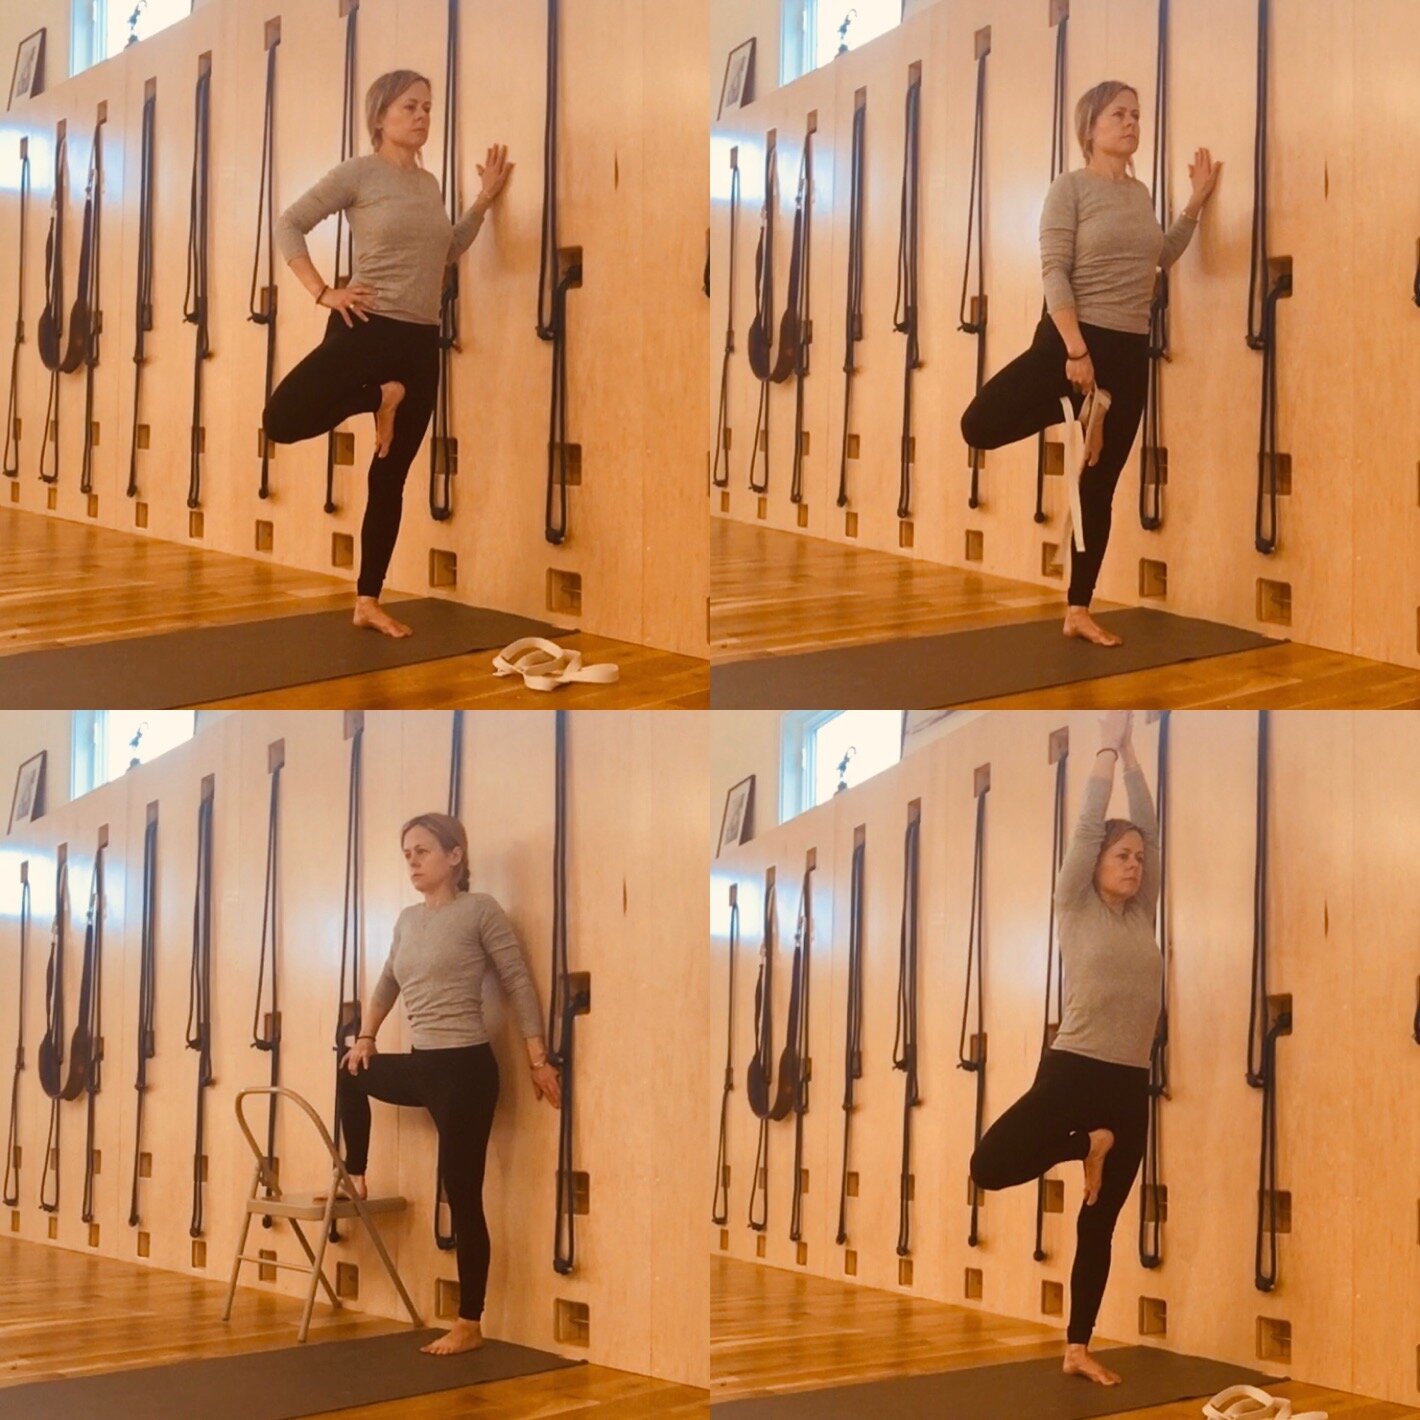
Vrksasana (tree pose)
Stand near a wall, it is there if you need it only. Bend you right leg and turn it out and then take it up, placing it high on the inner thigh of the balancing leg, toes pointed down. The action of turning the bent leg knee out and taking that knee back in line with the standing straight leg will engage the grip to the outer hip. Also grip the standing leg outer hip in. BOTH feet should spread evenly. If you cannot place the foot against the thigh, you can use a chair for the foot and still work the same actions or use a belt. This is one of the first times you learn to balance on one leg and it has a lot to teach you (Leanne, use a belt. You got this! Jason, are you practicing?):
Garudasana (the Eagle). This is an excellent balance pose, do many repetitions. I did not show the arm position but do it if you know it! Here the top leg that has to cross over the bottom leg. The top leg front thigh has to roll in for the legs to entwine. Apply the same grip at the outer hips (and you can balance with back to the wall and use hand to adjust the foot to hook as shown):

Ardha Chandrasana (half moon)- the base of this pose is Utthita Trikonasana. Forgive the poor quality photo! Start with Trikonasana (not shown) a few times and focus on finding that grip of the outer hips. The knees and thighs turning out will bring this action home.
When you come into Ardha Chandrasana see that the aerial leg hip stacks directly over the balancing leg hip and that the abdomen turns away from the floor. The wall is GREAT for learning this. Same grip to outer hips and, same spreading of balancing leg foot, keep the knees tight. Selena, your name also means moon, this is your signature pose!:

When you take your back to the wall, don’t lean or rest on wall. Just take the back heel, your top hand, and head to the wall to find your plumb-line. From there, roll the top hip up and bring the buttocks in and away from the wall (even if buttock still touches the wall that is fine, but they should move in and in the direction away from the wall. Grip the outer thighs in)

Virabhadrasana III (warrior 3)- the base or starting point of this pose is Virabhadrasana I (not shown). In Vira 1, focus again on the grip of the outer hips and work to roll the buttock down and lift the pelvis up, come in and out several times. Then try Virabhadrasana III, here are a few ways to work with support and the stages of the classic pose. This pose is very hard but builds important strength to your balancing leg and hip:

Dan, use the foot on the chair or your kitchen counter! Candy you too. Do it together!

From Vira 1, I start by raising the back heel. Then see how I bend at the hip and lower the torso to parallel to the floor. Here I have to grip the outer hips strongly and lift up from behind the pubic bone. From there, I can launch to balance.

Feel free to add in Parivrtta Ardha Chandrasana (revolved half moon)(not shown)
Utthita Hasta Padangusthasana I- this first stage is one of the most important I think. Repeat a few times. Shown are a few ways to work. If knee pains, catch behind as in first picture, otherwise hold the shin with both hands. If that is coming catch the big toe (or place belt around foot- not shown) Raise the bent leg up as high as you can keeping the top of the straight leg thigh back. Again, grip the hips in. Don’t let the raised leg flop out to the side, grip the outer hips in. This work builds strength in the outer hips. Got it Gil!


Here are a few ways to work with support (kitchen counter would work great) Don, you can do this! To my Monday lunch hour class and Tuesday beginners group, you can do all of these variations!:

Now, try Utthita Parsva Hasta Padangusthasana (upward extended leg to the side) and Parivrtta Utthita Hasta Padangusthasana (revolved upward extended leg)

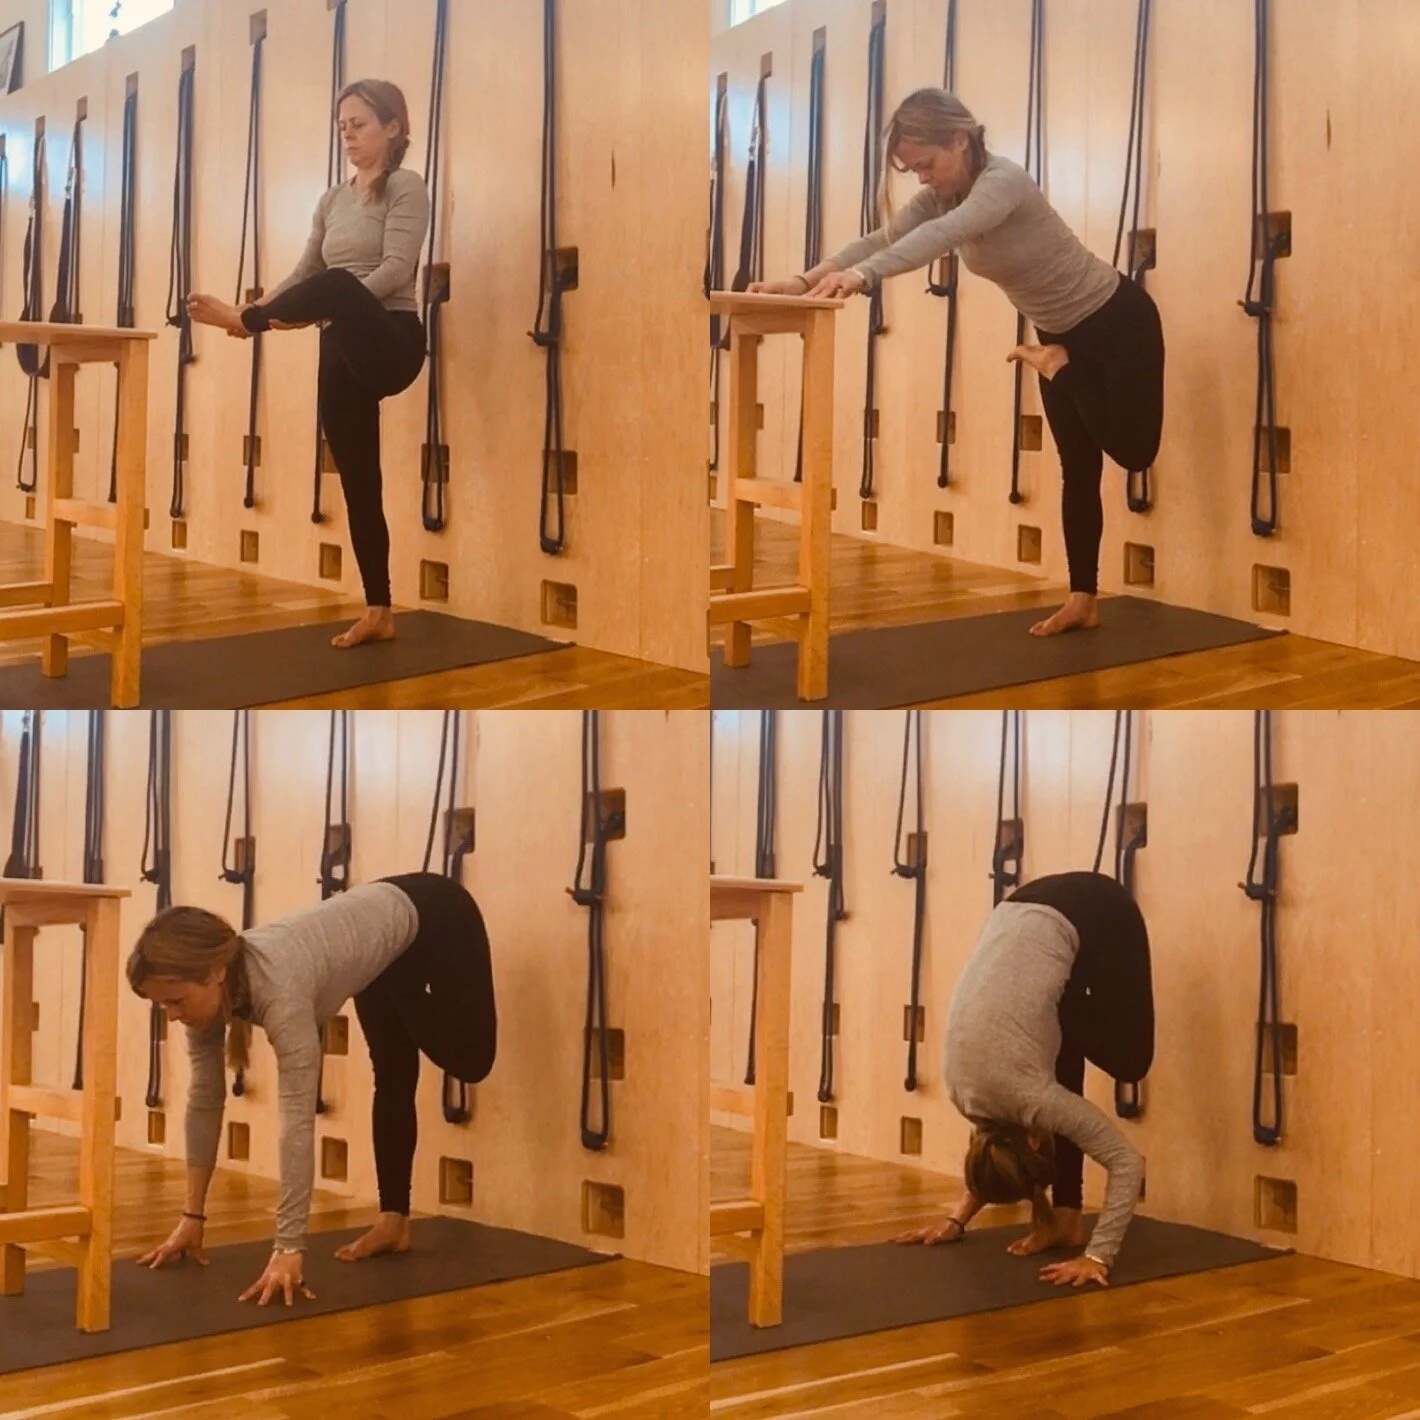
Ardha Baddha Padmottanasana (half lotus forward bend) I’ll start by showing the stages of the final pose and then how to modify. The bent leg in lotus shares the same actions as the bent leg in Vrksasana, tree pose. See how I am near the wall, if you need it to lean against, that is a great way to work in the pose!:

If the knee pains, place your shin on a support and keep the foot and knee in line so that there is space behind the knee (opening at the back of the knee should be wide). Anja, Viv, Bebe, Nancy this is good for you! If the shin rests down easily, you can bend forward. If the knee is up, work to turn the knee out and get the shin to rest easily on support before bending forward).


*this pose is best approached in stages. If you have very tight hips, you might try
the Supta Padangusthasana cycle first (shown in the home practice sequence for Opening into Lotus).
Now, for a few earth bound balancings. You might do a few forward bends to prepare. Seated forward bends passively contract and strenthen the abdominals and make the posterior spinal muscles and legs more elastic. The arm balancings will come best after you’ve made progress on your forward bends. If you are a beginner, just work with your forward bendings, you are planting seeds for future joys by spending time here.
Paschimottanasana (intense stretch of the western side) shown below are the four stages of entering any of the forward bends. Take time in each stage and use a belt if needed (not shown) and sit on height if difficult to get the spine upright (also not shown)

For the next few forward bends I will just show one or two stages, not all.
Janu Sirsasana (head to knee pose). See how the leg position is similar to tree pose? If the bent leg thigh lifts off the floor, remember to take height under the buttock and support the knee if needed. Carol, do both! Larry, use the belt. Tracy will show you how!


Ardha Baddha Padma Paschimottanasana (Half lotus forward bend) Catch the foot with belt or hand. Don’t force lotus, repeat last pose if needed.


Marichyasana I (Sage Marichi) start with twisting and pressing the knee into the arm and the arm back into the knee to turn. Keep the Dandasana leg rolling in and straight. Mac, you got this!


In this forward bend, the action of going forward is harder to achieve and develops stronger abdominal muscles. It is great prep for the earth bound arm balances!
Why not have a little fun and jump from this stage to the next pose!
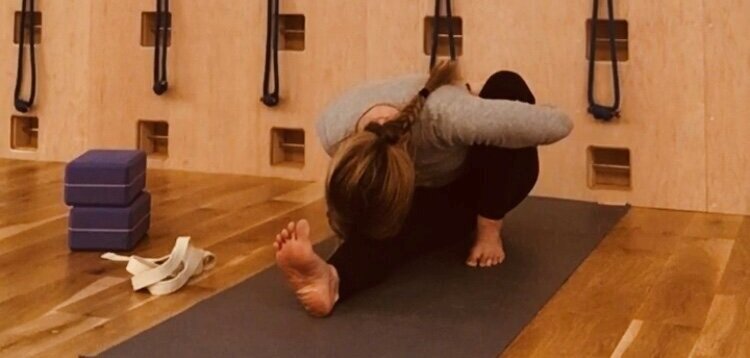
Eka Hasta Bhujasana (one leg over shoulder pose). See how I take the Marichyasana position to start and build from there, once I’ve turned and clasped, I raise the foot up to begin and nudge the shin back:

From here, I release the clasp and tuck the upper arm under the knee. The bent leg has to stay gripped in though once the shoulder is tucked! All of the work to grip the outer hips in during you standing poses, you need to apply here. Liberally. Both thighs should roll in. Even if you can only do this first part, it’s a start. Tessa, you got this!

I start by leaning a little forward so the elbows bend and I have leverage to push up! Kelly you got this! Corey, you too! Gil, lift the dandasana foot (oh wait, you’re not reading this. . haha)

Lolasana (to dangle) This is actually a really hard pose. It’s a bit hard to see but notice that my legs cross at the shin. Joey and Brenda, no hamstring woes here so no excuses! There has to be an intense grip tot he outer hips. Start with the arms bent in order to help give you some launch to get up! See prop options as well. The props will bring joy and lightness. Enjoy!:


If it is difficult to raise the feet and shins, put a belt looped around shin and thighs and pull it tight to catch and lift the shins. Corey, are you reading this? You don’t need any props, you got this!

Tolasana (the scales). I begin by sitting in padmasana, even here there has to be a strong grip to the outer hips. From here, I press the palms down to lift up. Jonah! you can do this. Andy, I bet you can too.


If Padmasana is not possible, you can do from half lotus or simple cross legs by using a belt. I use a large belt loop and cross it at the center to form a figure 8 of sorts. Each small loop then has to hook around one knee and foot. Then I pull tight to secure. From there, lift up! All can do! See the progression:


On the way to the last few arm balances, you might consider adding in these variations to better prepare the leg and spinal muscles:
Wide Paschimottanasana:

Upha Vishta Konasana (seated wide angle pose), coming forward:


Kurmasana (tortoise)

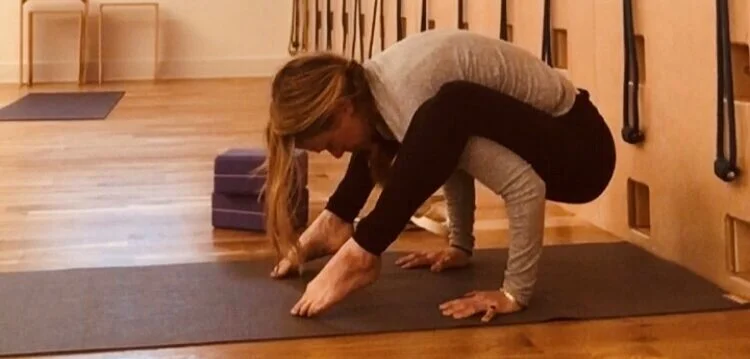
Dwi Hasta Bhujasana (two hands shoulder pose). I begin in a wide Uttanasana with knees slightly bent, see how I bring my torso close to my legs.

Then I tuck each shoulder under. . .


Once the arms are tucked, I lower the buttock down which begins to lift the feet up. If wrist flexion is difficult, place a rolled mat under heel of hand or a slant board. Jaime you and Dorian got this!
From here, I can lift the feet and bring them to join. The forearms have to squeeze in at this point to bring the feet to join (and later to entwine)

Jess and all my Wednesday a.m. ladies, you got this!

Bhujapidasana (shoulder pressure pose) this pose builds from the last, pida means pressure. There is a stronger grip and squeeze to the forearms and outer hips in.

*you can use bricks under hands if needed! who is that shaggy dog up there?

Tittibhasana (firefly) Start like you did going into Dwi Hasta Bhujasana and go from there! My Thursday tribe, you got this .. . now you’re flying!

Where to go from here? So many places.. .but if you are ready to call it a day, to cool down, take Adho Mukha Svanasana. Then take Padmasana or Swastikasana and twist to each side, then perhaps Bharadvajasana I and II and perhaps Purvottanasana. Chatush Padasana and a supported Setu Bandha are also good options. The most important thing is to slowly bring the spine back in. You’ve been doing a covex shape for the last handful of poses so you’ll want to give a neutral position to the spine first and then bring it in as a counter pose.
May your practice remind you that you are both of the earth and part divine, a balance of the humble earth and the majestic sky.
Aum Peace Peace Peace
Our home practice resource material is free and open to all. If you are enjoying our home practice resource material and feel inspired to donate, you can below. It is completely optional.
