
Opening the heart
The practice of backbends is uplifting to the spirit and infuses the mind with joy. When we are depressed the chest caves and the shoulders slouch forward. When we actively lift and spread the chest and roll the shoulders back, as we do in a backbend practice, we help cleanse the body of these impressions which in turn sends a signal to the mind ‘Hey, we are not staying here in this sad state, let’s go. Take my hand.’ The gentle hand of asana can be the best guide you might ever meet.
In these times as we navigate a lot of unknowns, anxiety, fear and depression may start to creep in. Backbends are an avenue to redirect the mind away from these qualities and towards a more peaceful, accepting and joyful state. While backbends cannot change our circumstances, they can change how we react and respond to them.
To my students, well, again, this is not a full sequence. It focuses mainly on showing the progression of stages of a few staple backbends and a handful of more penetrating advanced ones. There are SO many ways to work with backbends and so many to explore. This is really a small and insufficient sampling but it might prick your memory bank and provide some inspiration for ways to work.
There is so much to say about backbends. My internal editor is having a hard time. The most important thing to say is that they are a later introduction into the learning experience. Backbends require a heightened sensitivity to what you cannot see.
Being able to feel yourself in space when you cannot see what you are doing can be disorienting. Most of what you are doing in a backarch will not be visible to you. Guruji says that this practice of backbends helps you develop a trust in the unknown and your intuition. It heightens our faith in God as it affirms for us that even when we cannot see something clearly, we can perhaps sense it. We lose our attachment to what we can see and dive into the mystery of what we can’t see. How wonderful is that. Having said that, backbends requires that the right and left sides of the body work in harmony with each other. The advantage of the standing postures that we start with for beginners is that you get a sense of how VERY different your right and left sides are from each other. And you get a chance to bring more evenness. If your right side is very stiff and your left side very loose, that can complicate backbends. One side may be applying the brakes and the other side may be accelerating. That normally results in a bit of a crash. No fun. So be wise and be a good listener as you explore backbends. Never force the body. If the body says, ‘Enough’ be content with where you have arrived. Any small amount done well will have a positive effect.
If you are newer to practice, start with an abundance of of standing poses (they are kind of like your vegetables. Eat a lot of them), then you might just stick with the first few backbends, the baby backbends, and skip the rest. If you are advanced, proceed mindfully and go through each stage. Even if you can do the final pose with ease, it is kind to the body to prepare it well. You will feel that priceless quality of sattva, lightness and luminosity, with such an approach.
Suggested poses to begin: you might start with the first handful of
poses from the last abdominal sequence that I just posted: Utthita Parsvakonasana,
Viminasana, Virabhadrasana I, Parivrtta Parsvakonasana in stages, and Paripurna Navasana (boat pose). From here you might do Adho Mukha Svanasana (downward facing dog) followed by Prasarita Padottanasana (widespread feet and leg pose) and then Sirsasana or repeat dog pose with head support. Adho Mukha Vrksasana (full arm balance) and pinchamayurasana (the peacock) would be great additions. I’ll do a sequence for those one day! Another option is to practice the following:
Utthita Trikonasana, Vrksasana, Virabhadrasana I, Ardha Chandrasana and Virabhadrasana III, followed by full arm balance and Sirsasana. . .there are really a lot of avenues you can take. Starting with twists can feel good if you have a lot of thoracic stiffness. Starting with the laterals is nice if you carry a lot of tension in the hips and lower spine. Gosh, it’s always so exciting to me . . .so many paths you can take! Never boring. So here it goes (and yes, I love backbends. . .how could I not, they are such a friendly guest!)
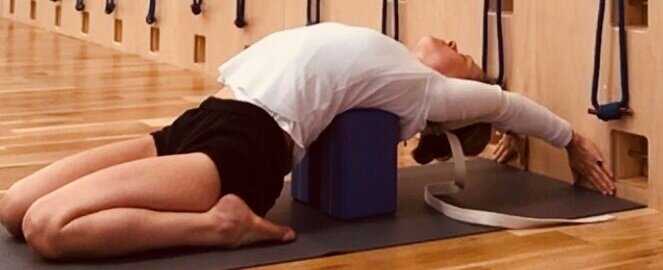
Building on the above sequences, you then add Supta Virasana or Supported stages of Paryankasana. Supported Paryankasan is wonderful for opening the chest and shoulders. Here are a number of stages. You can work these stages quite awhile!
Paryankasana (Vishnu’s couch)
Stage 1, two high bricks, one between shoulder-blade and one for head. If you need to sit on height, place that same amount of height that you are sitting on under the two bricks as well. A bolster could work well or a couple of folded blankets. You can lower the brick under the head to intensify the coil as shown in the last image. The most important thing is to adjust the shoulder-blades evenly onto the back and when stretch the arms overhead, keep the shoulderblades fixed and extend arms fully, the wall will help you to measure which arm lengthens easy and which is stiff. You have to proceed with caution and repetition for the stiff side.


A second variation (which I LOVE) is placing two bricks on the thoracic, one for each shoulder-blade and using a belt around the upper arms as a sling for the head. Rest back and then put the belt on, don’t put the belt on first. The belt shouldn’t be against the neck, rather it should support the occiput/base of skull. If the shoulders are stiff, this might be too intense and you can skip.

The baby backbends that follow warm the spine. I like to use a belt in various ways while practicing back bends to increase my awareness between my right and left side.
Salabasana (locust)- try belting your calves. Robin, I know you love this variation! But not too tight! Sometimes I break the pose up, lifting just my legs first (shown), sometimes just my arms (not shown) before I venture into the full pose. Repetition is a must! KEY WORK: keep the shoulderblades absorbed onto the back and keep the tailbone long and IN! The buttock should roll away from the back and the middle buttock has to press down to keep the tailbone in. This action is paramount in all backbendings. Got it! All these instructions should be familiar to you. And to my students, yes, you need to deal with all three buttocks, top, middle, and bottom! Got it KB!
Do 5-10x minimum. I mean it. And roll the front thighs in and try lengthen them away from the hips. The hamstrings should be active which tucks the third (bottom buttock) in.


Bhujangasana (cobra)- see how my hands are a little forwardto start, that gives me better leverage to pull my chest forward. My hands are pressing down and pulling back to move my abdomen, waist, and chest forward. Don’t start by lifting up, work first mainly to get your chest forward of your upper arms and shoulders, up happens! See that the shoulders roll back as the chest moves forward. Again, buttock has to roll away from the backwaist and tailbone in.


Urdvha Mukha Svanasana (upward dog) is not shown. Why? Because I forgot to do it. But you should!
Ustrasana (camel pose) in stages. One stage I regretfully don’t show is using a
chair. If using, kneel as in the second picture and place the chair behind you and starting with the hands on a chair seat (this is GREAT if you have a stiff back as it gives you ample height and lightness). Elizabeth, that is best for you, you know that set up! If you remember that variation from class, you might add it here. Otherwise, what I have pictured below will suffice for now. Notice that the shoulders are back and the chest is lifting up. Should start to feel familiar. To come up into the full pose, I keep my shoulders back and raise my buttocks up, rolling them away from the back waist and pressing them in as I come up. Do several attempts until you find the rhythm. Don't let your chest sink at any point. Keep it lifted. I am yelling at you to do this right now, can you hear me? I mean business, I mean check out the look on my face here. This woman ain’t kidding. . hahah


If hands to the bolster is coming along, try hands to the heels. But keep the lift of that chest, it is the pot of gold at the end of the rainbow. That means you too Al and Andy.

Dhanurasana (bow pose)- Oh gosh, I love this pose. Bebe, did you just say ‘I don’t?’ Ha. I like to use a belt to keep my legs symmetrical. Don’t make the belt too tight (but also don’t let it be too loose). If you line of the heels with the outer hips that is about where you need to be. If it pulls at your knees to use the belt, just skip using it for now.
We can talk about how to do that later in class (because there will be classes again one day!) I’m smiling inside. Viv, use a belt around the ankles if you need. Bebe, you too!

Dwi Pada Viparita Dandasana on a chair is very similar to Dhanurasana, but the chair gives you a chance to stay longer and increase space. Enjoy! And support your head if you need to, Roger that Robin! The bent leg stage makes it easier to access the movements of the buttock (same actions from above)

The straight leg variation increase a feeling of length and elongation. I am showing the brick on high height. You can lower the brick. Lowering the feet intensifies the back arch, raising the feet lessens it. If you have a stiff low back, use a second chair to support feet (not shown) so that your feet and hips are on the same level. This will keep the back arch isolated to the upper chest (Lynn, use that second chair!). Again, support head (not shown) with a bolster if you have neck or back ache. Raquelle, you always love this pose, enjoy!


Urdvha Dhanurasana (upward bow)- this is a vast field of joy. I’m showing a handful of approaches but oh my, not all. There are so many ways to tackle this pose. I regret not including how to push up from stacked bolsters but most of you know how to do that!
If you are a beginner, use a chair, even if you don’t push up you can place the body and you will benefit from just this first shape. If you can push up, great! Francesca, you got this!


If you have stiff shoulders or difficulty bearing weight on your shoulders you might try this variation (Viv, Robin, Michelle, Susan, Bebe, Joey, Andy. .. good for all y’all) Notice how my feet are holding the chair legs down, the pivot point is the tip of my shoulder-blade. I start by stretching the arms to the wall, if that is coming I can intensify by walking the hands down the wall, see the progression


If the pose is coming along from the chair, you can try pushing up from the floor (I am pushing a bit too much into my chest and my teacher Patricia would scold me for this, I should bring my buttocks further away from the wall here). However, if you are preparing for Dwi Pada as we are about to undertake, taking your chest to the wall like this helps open the armpits! You can also try stacking two bolsters under you to start and try pushing up from there (not shown):

Dwi Pada Viparita Dandasana (two-footed inverted staff pose). Oh my, this pose is for the heart. It is a boon for depression and is infectious with its joyful nature. The chair is there as a mold, keep the legs, buttocks active!
Notice the progression using the chair. Don’t force a stage that is not ready yet, be content with an earlier stage. There is so much joy in keeping it simple. Also, can you see how my buttock is higher than my knee in this first pic? You tall folks (Carolyn Kat, Rebecca, Beverly, Michelle, Zeph. . .so many) might need a blanket or two under your buttocks to get them higher than the knee!:


Now from the floor! Oh gosh, so many stages. . .what to do. . .here they are, whew, I love them all. If the shoulders are stiff, use the chair and/or try elevating the feet. So many ways to work. In the bent leg stage you get more access to lift from the buttocks, when the legs straighten the coil of the spine intensifies and it is a bit harder to generate lift, the hamstrings have to work very hard. If you are new, stick to the bent leg stage for a while . . .
The first stage, shown below is important. Remember Ustrasana and how the upper spine had to support and lift the chest, well, you have to find that here. The upper back should be like a breaker wall, firm steady. Holly, YES YOU CAN!


The following stages show the progression from bent to straight. It’s an adventure! Mary Lou, do at least One! Laura Lee, do Two! Paige and Kat, do Three! Jennifer and Bill, you guys try this, come on, you can do it. The most important thing is to keep a feeling of lift in the region of the shoulder, at the middle upper back and the buttock. As the legs stretch straight you have to tighten the hamstrings!


And why not drop back.. . you can see all the earlier poses manifest in this effort. Nervous about trying dropping back, you can set up near the wall and drop to the wall or a chair to wade in (not shown).


And why not taste Kapottasana (the pigeon)! Such a joy filled and exhilarating pose! Paige, Kat, Lorin, Rachel, Beth, Becky, Mary Lou, Holly. . .you all can do one, two, three or all of these stages, so go for it! If you’ve come this far, you know what to do! Do each stage as a pose, spend and a few breaths then come up and repeat going further (or not!). Your body will appreciate the repetition.


Every party comes to an end. . here are a few poses to bring you back to earth!


I hope this sequence (or even just parts of it) challenge and inspire you and bring you joy. We are not together in class, but we are together in spirit. Love your neighbor, offer extra smiles, even if from a distance. Everyone needs it right now. And let this practice fill you up so that you have more to give.
Aum Peace Peace Peace
If you are enjoying our home practice resource page and feel inspired to donate (not required) you are more than welcome to through our donation link below.
