
Opening to Lotus, for healthy hips and a stable seat.
Lotus posture is the most stable and alert position to sit
in for pranayama and meditation. However,
getting the hips open and able to sit comfortably in Lotus posture can take
time.
This is not a full sequence. It is just a partial sequence!
If you are an advanced student, you might start your practice out with inversions:
Sirsasana (head balance) and Salamba Sarvangasana (shoulder balance) before
beginning this series. If you are a beginning student, start out with a handful of standing postures to warm the body and prepare the hips then end with inversions or their alternatives.
Supta Padangusthasana has MANY stages. Even Stage One, catching the big toe, has
multiple stages of progression. You can spend an hour on this cycle. I’m not kidding. Do a lot of repetition. Listen keenly to what the body tells you and do not force any opening. Opening will come on its own. You cannot yell at a flower
or pry its petals back with your fingers to get it to bloom. You nurture and tend to it and well, you wait for it to bloom in its own timing.
And forgive the quality of the pics! I’m winging this guys! Doing the best I can with what I have. But it should give you a sense of how to progress. Enjoy your practice! And Hanna clan, you can totally do some of this with your kiddos!
Start in Supta Tadasana with the feet against the wall, this
will help you to feel grounded and to sensitize your body to any distortions that
come with each movement. Don’t fall asleep here.

Akunchanasana- (abdominal asana, knee to chest). There are several ways to work. You can catch behind the knee if you have difficulty flexing the knee, or you can hold the shin for a deeper flexion. Regine, this is a great series for you!


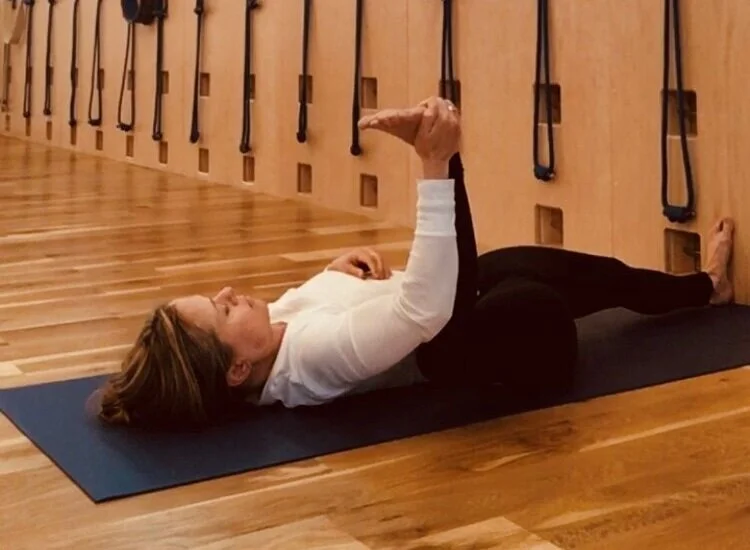
Supta Padangusthasana I- (reclined hand to big toe pose) If
you are using a belt because of stiffness, put a loop in it to avoid the strain
that comes from clenching a belt. Hold it loosely with your middle and index finger.
From there, there are several progressions from holding belt, to toe, to foot, to clasp and head to shin. Repetition is key! It may take time to get the later hand clasps, but you can start working in that direction. Be patient. Opening the hamstrings takes years (right Britt? :).


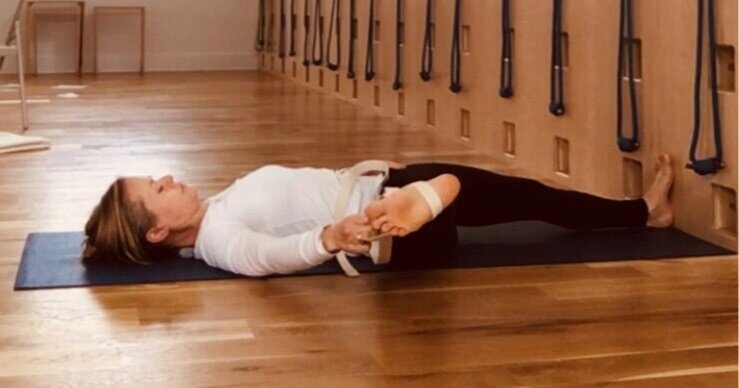
Supta Padangusthasana II as in LOY- (reclined hand to big toe, leg
bent) Well this is a hard one. There are
several stages that I will post here. Nancy and KB, this is good for you ladies and those stiff left hips! Start with the leg bent and just work on flexion in the hip:

From here, cross the shin across the chest. Start with both legs bent to give ease of movement to the hip, extending the bottom leg straight is a big intensifier so give the hips some time and repetition before adding that in! Viv, you can do this!


Supta Padangusthasana III- (reclined hand to big toe, leg
out laterally to the side) this can feel refreshing after the last variation. Be sure to turn the thigh out and grip the outer thigh to support the weight of the leg.
If the leg goes into hostile takeover mode, put a rolled blanket or
towel under the upper thigh for support (not shown, but surely you guys can
remember this modification!). Don, these are good for you!
Akarna Dhanurasana I and II- (the archer)- Start with motion, motion, motion. ..And consider sitting on two blankets to bring lightness to the spine (not shown)
I can’t show motion and movement in a still pic, but it is good to pull the arm (elbow up!) up and back to lift the leg and get it to move with rhythm back behind the
waist. Start loose, just working the bent leg and then slowly go for tightening the hold and adding in the bind of the opposite leg. Progression shown below! Hey you, yes you, keep your elbow up!


For the next few poses, sit on the corner of two
blankets if you have stiff hips. You know who you are:

Baddha Konasana- (bound angle pose)

Siddhasana- (auspicious pose) start placing the feet in
front of each other, see that the shins rest down. If this is coming along, stack the feet. You got this Lorin! See the progression here:


Swastikasana- (simple cross leg). Sit in simple cross leg. If the legs rest easily on the floor, you are ready to consider trying Lotus posture. Tracy, you are ready for the next step. I just know it!

Half lotus- From here, if the legs move easily, slide the
shin/ft toward the opposite leg hip for half lotus. If the legs and hips move freely you can progress from there. Never force. If the leg feels very heavy, then you are not ready to progress. Larry, you can always go back to an earlier stage. And don’t forget to use that belt behind your knee! Tracy will remember how to do it. . .And Jerrod, if you are reading this, we will get you into Lotus after you get married :).

Padmasana- (lotus) – start with the knees wide and a shallow
cross of the ankles (this wide and open lotus is sometimes referred to as
Kamalasana- lotus bud). Keeping the legs wide and loose will create freedom and ease.
When that is coming you can go for a tighter lotus.

After you accomplish lotus, well your practice has just begun!
Open Light on Yoga and do the full Padmasana cycle! It is fun to try. Dive in and explore the many poses that are
built from Lotus. Have fun. Be safe. And most importantly honor your knees and do not force progress.
Aum Peace Peace Peace